Thai Zucchini Noodle Bowls
- Yield: 2 bowls (easily doubled)
Ingredients
- ~2 oz. gluten free pasta, cooked according to package instructions then cooled*
- 2 zucchinis, spiralized (see post for the spiralizer I have and love)**
- 3 and 1/2 tsp. low-sodium Tamari or liquid aminos, divided
- 1/4 cup nut butter of choice (I used peanut butter)
- 1 and 1/4 tsp. pressed/grated garlic
- 1 and 1/2 tsp. freshly grated ginger
- 1 tsp.+ Sriracha
- 1 tsp. honey/maple syrup
- hot water, as needed
- 1 Tbsp. olive oil
- 2 bell peppers, sliced into thin strips
- 8-oz. mushrooms, sliced
- salt+pepper
- For topping: chopped green onions, peanuts/cashews, extra Sriracha
Instructions
- Set noodles and spiralized zucchini aside.
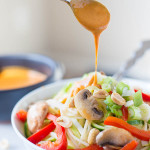
- Make your sauce: Add nut butter, garlic, ginger, Sriracha, honey, and remaining 2 and ½ tsp. Tamari/liquid aminos to a small bowl. Slowly add some hot water to thin, and mix to combine. You’ll want the sauce pourable, but not overly watery (see first photo in post). Use your judgement here. Taste, and adjust as needed.
- Cook your vegetables: Add olive oil to a medium skillet over medium heat. One hot, add pepper and mushroom sliced and turn to coat in the oil. Season with salt and pepper to taste. Cook until vegetables are tender, 5-7 minutes. Allow to cool before assembling your bowls.
- Assemble your Thai Zucchini Noodle Bowls: Mix gluten free pasta and spiralized zucchini in a bowl. Toss with some (not all) of the sauce, just enough to coat each noodle. Divide into two bowls. Top with cooked vegetables and serve with leftover sauce, green onions, peanuts/cashews, and extra Sriracha.
Notes
*If you’d rather have a bowl filled with only zucchini noodles, go for it! Skip the pasta and spiralize an extra zucchini.
**If you’re not a fan of super-long zucchini noodles, feel free to cut them up into smaller pieces with some kitchen shears.
Find it online: https://www.fooduzzi.com/2016/02/thai-zucchini-noodle-bowls/